Master Cool Rise Bread: Soft, Sturdy Slices for Any Meal
Imagine waking up to the aroma of freshly baked bread, knowing that the active effort you put in yesterday was less than 20 minutes. This isn't a dream; it's the reality of mastering **cool rise sandwich bread**. This revolutionary method takes the intimidation out of homemade baking, delivering consistently soft, sturdy slices perfect for any meal, from a gourmet sandwich to a comforting slice of toast. Gone are the days of constant dough-watching and multiple proofing cycles. With cool rise, your refrigerator does the heavy lifting, deepening flavors and developing superior textures while you sleep.
The Magic of Cool Rise: Why It's a Baker's Secret Weapon
The concept of "cool rise" might sound mysterious, but it's a simple yet brilliant technique rooted in the science of slow fermentation. Instead of letting your dough rise rapidly at room temperature, you place it in the cold environment of your refrigerator for an extended period, typically overnight or even longer. This cool slumber isn't just about convenience; it's a critical step that fundamentally transforms your bread.
Here's why cool rise is a game-changer for bakers, especially those new to yeast or intimidated by traditional methods:
* **Deepened Flavor Development:** At lower temperatures, yeast activity slows down considerably. This prolonged, gentle fermentation allows enzymes within the flour to break down complex starches into simpler sugars, which the yeast then consumes. This slower process creates a broader spectrum of flavor compounds, resulting in bread with a more nuanced, rich, and often slightly tangy taste that simply can't be achieved with a quick room-temperature rise. Think of it like slow-cooked stew versus fast-cooked.
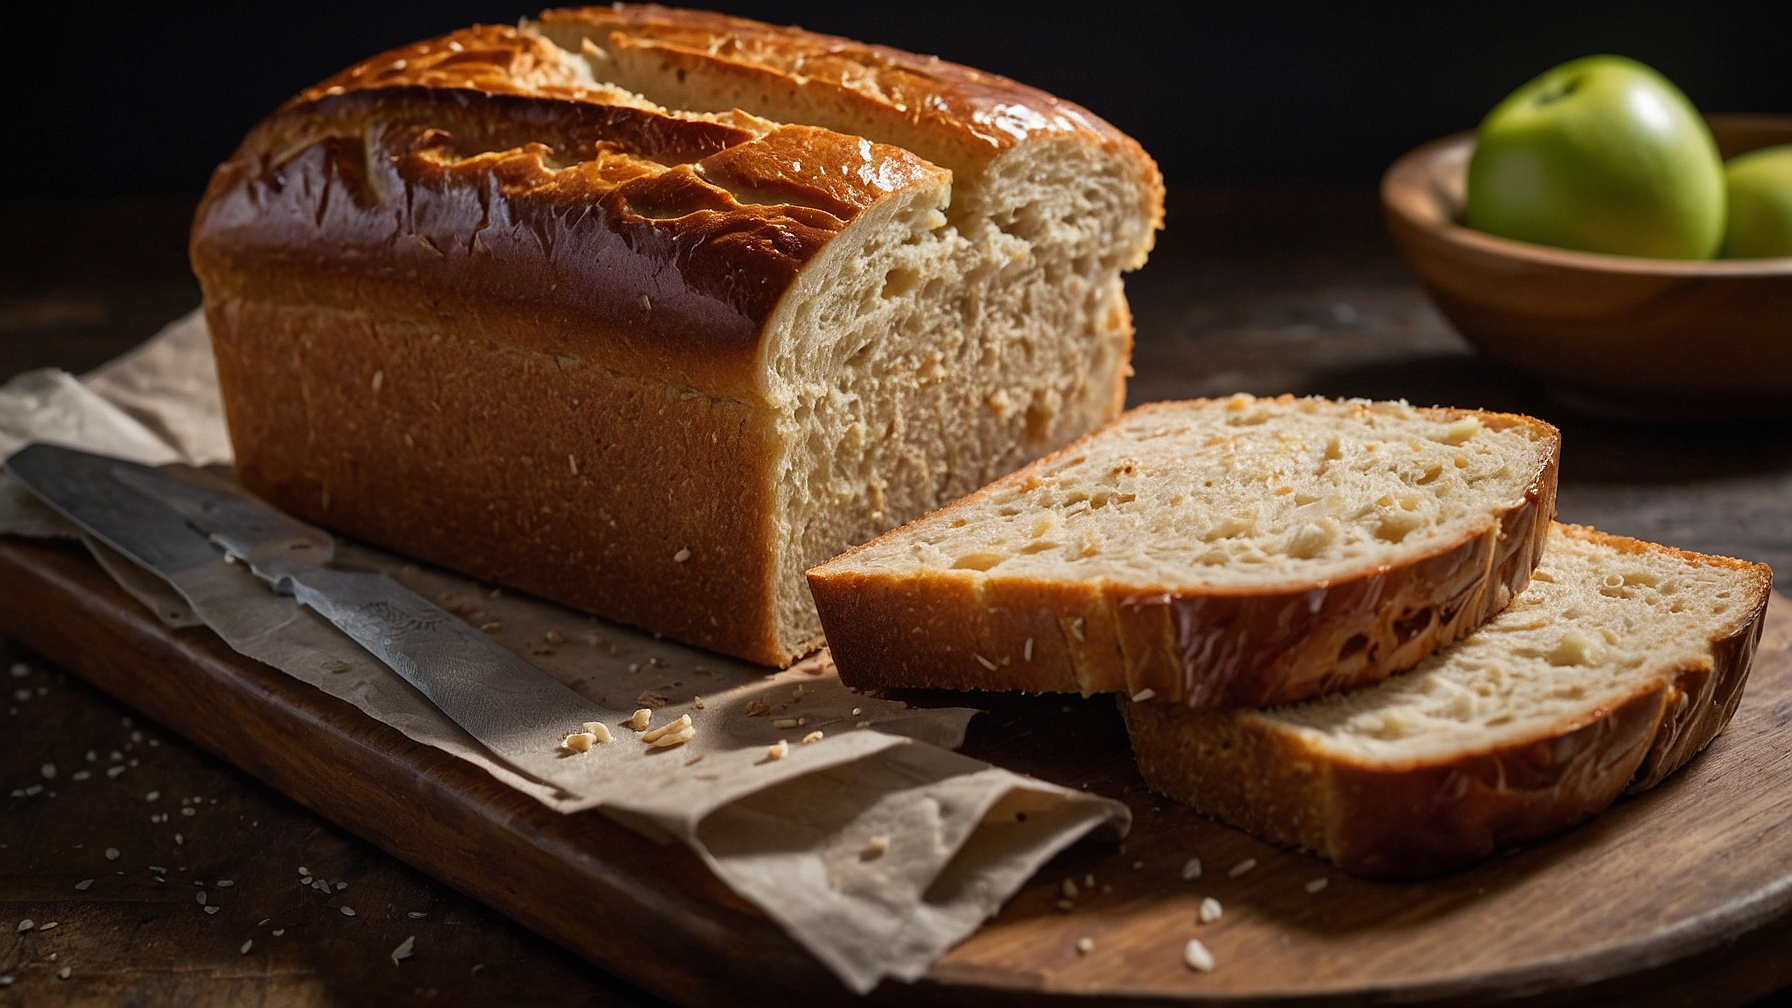
* **Superior Texture:** The extended cold fermentation also contributes significantly to the bread's texture. It gives the gluten network more time to relax and develop without overworking, leading to a more elastic dough. This elasticity translates into a wonderfully soft, open crumb with a satisfying chewiness and an excellent structure that holds up beautifully to even the most generous sandwich fillings. Say goodbye to dense, crumbly homemade loaves.
* **Unbeatable Convenience:** This is perhaps the most celebrated benefit. With only about 15-20 minutes of active mixing and kneading (often handled effortlessly by a stand mixer), you can pop your dough into the fridge and essentially "forget about it" until you're ready to bake. This hands-off approach makes fresh bread feasible even on busy weekdays, allowing you to fit baking into your schedule, not the other way around. The dough can often be stored for a week or two, providing incredible flexibility.
* **Conquering Yeast Phobia:** Many aspiring bakers are initially daunted by yeast, fearing failure. The cool rise method is incredibly forgiving. The slow pace of fermentation offers a wider margin for error, making it a perfect starting point for anyone looking to build confidence in their bread-making skills. The consistent results are truly encouraging.
By embracing the cool rise method, you're not just making bread; you're crafting a product with enhanced taste, superior texture, and unparalleled convenience. It's truly a secret weapon in any home baker's arsenal.
Crafting Your Perfect Cool Rise Sandwich Bread: A Step-by-Step Guide
Making **cool rise sandwich bread** is surprisingly straightforward, especially when you understand the few key steps. The beauty lies in its simplicity and the minimal active involvement required. For an even deeper dive into the exact ratios and ingredients, check out our article:
Effortless Cool Rise Sandwich Bread: 15-Min Prep & Overnight Flavor.
Here’s a general overview of the process:
-
Activate Your Yeast (If Needed): While some recipes use instant yeast that can be added directly to dry ingredients, many cool rise recipes call for active dry yeast. This usually means dissolving it in a small amount of warm water (around 105-115°F or 40-46°C) with a pinch of sugar. Watch for foamy bubbles – a sign your yeast is alive and ready to work!
-
Combine Wet Ingredients: In a large mixing bowl (or the bowl of a stand mixer), combine the activated yeast mixture with other liquid ingredients like warm water, oil (for tenderness), sugar (for flavor and yeast food), salt (for flavor and to regulate yeast activity), and beaten eggs (for richness and color).
-
Gradually Add Flour: Begin adding flour, typically all-purpose or a blend, one cup at a time. Mix until a shaggy dough forms, then continue adding flour until the dough comes together and pulls away from the sides of the bowl. It should be slightly sticky to the touch but manageable.
-
Mix/Knead: If using a stand mixer with a dough hook, knead for about 5-8 minutes until the dough is smooth and elastic. If kneading by hand, this might take 10-15 minutes. The goal is to develop the gluten network, which gives bread its structure.
-
The Cool Rise: Lightly oil a large bowl, place the dough in it, turning once to coat. Cover the bowl tightly with plastic wrap or a damp towel and place it directly into the refrigerator. This is where the magic happens! Let it rise overnight, or for at least 8-12 hours, up to several days. The dough will slowly expand and develop incredible flavor.
-
Shape and Proof (Optional): When you're ready to bake, remove the dough from the refrigerator. You can let it warm up on the counter for 30-60 minutes for easier handling, or shape it while still cold. Gently punch down the dough, divide it (if making multiple loaves or rolls), and shape it into your desired form, typically a loaf for sandwich bread. Place it in a greased loaf pan.
-
Final Rise (Proofing): Depending on how warm the dough is, it might need a final brief rise at room temperature before baking. Look for the dough to have risen about 1-1.5 inches above the pan's rim. This could take 1-2 hours, or less if shaped warm.
-
Bake: Preheat your oven to the specified temperature (often around 350-375°F or 175-190°C). Bake until the crust is golden brown and the internal temperature reaches 200-210°F (93-99°C).
-
Cool: Immediately remove the bread from the pan and let it cool completely on a wire rack before slicing. Slicing warm bread can lead to a gummy texture.
Following these steps will lead you to incredibly rewarding results – a homemade loaf that's far superior to anything store-bought.
Beyond the Basic Loaf: Customizing Your Cool Rise Creations
One of the most exciting aspects of **cool rise bread** is its incredible versatility. While the foundation is a beautiful, soft, sturdy sandwich loaf, the dough itself is a blank canvas for culinary creativity. From adapting the flour type to incorporating various flavors and even transforming it into different baked goods, the possibilities are endless. If you're looking for more guidance on general cool rise dough applications, take a peek at our
Beginner's Guide to Cool Rise Dough: Easy Baking, Delicious Results.
Here are some ways to customize your cool rise dough:
*
Whole Wheat Wonders
The reference context mentions experimenting with half whole wheat, and even going for 100%. Incorporating whole wheat flour adds a deeper, nuttier flavor and boosts nutritional value.
*
Tip: Whole wheat flour absorbs more liquid than all-purpose. When substituting, start by replacing 25-50% of the white flour with whole wheat, and be prepared to add a little extra liquid (water or milk) if the dough seems too stiff. You might also want to increase the sugar slightly to balance the whole wheat's more robust flavor.
*
Flavor Boosters for Every Palate
Elevate your basic loaf with simple additions:
*
Sweet & Rich: Add a drizzle of honey or maple syrup along with the sugar for a slightly sweeter profile. A sprinkle of cinnamon or cardamom can turn your sandwich bread into a delightful breakfast toast.
*
Savory & Aromatic: Incorporate dried herbs like rosemary, thyme, or oregano for an aromatic loaf perfect with Italian meals. Garlic powder, onion flakes, or even some grated Parmesan cheese can create a savory bread ideal for grilled cheese or dipping in olive oil.
*
Textural Variety: Mix in seeds like flax, chia, sunflower, or pumpkin for added crunch and nutrition. A handful of rolled oats can also add a pleasant chewiness and rustic appeal.
*
Different Shapes & Uses
The cool rise dough is incredibly adaptable and isn't limited to just loaves:
*
Dinner Rolls/Hot Rolls: Divide the dough into smaller portions, shape them into rounds, and place them in a baking dish. They bake into wonderfully soft dinner rolls, perfect for any meal.
*
Cinnamon Rolls: Roll out the dough, spread with a cinnamon-sugar-butter filling, roll it up, slice, and bake for decadent, gooey cinnamon rolls. The overnight rise makes this a breakfast treat you can prepare mostly the night before.
*
Pizza Dough: The same cool rise dough can be stretched or rolled into a pizza crust. The slow fermentation imparts a superior flavor and texture to your homemade pizza.
*
Bierox/Runza: For something truly unique, try making Bierox (or Runza), a German-Russian pastry filled with seasoned ground beef and cabbage. The robust cool rise dough holds up beautifully to the hearty filling.
This adaptability makes cool rise dough an invaluable tool in your kitchen, allowing you to produce a wide array of baked goods with minimal fuss.
Troubleshooting & Tips for Cool Rise Success
While **cool rise sandwich bread** is incredibly forgiving, a few tips can ensure consistent success and address common concerns.
* **Dough Consistency is Key:** The dough should be slightly sticky but still manageable. If it's too sticky, add flour one tablespoon at a time. If it's too dry and stiff, add water or milk a teaspoon at a time. Over-flouring can lead to dense, dry bread.
* **Yeast Check:** If your dough isn't rising, the culprit is often inactive yeast. Always check the expiration date and ensure your water isn't too hot (which kills yeast) or too cold (which won't activate it). The warm water should feel like a comfortable bath – not scalding, not cold.
* **Don't Rush the Cold Rise:** While the dough will technically be ready after 8-12 hours, allowing it to rise for 24-48 hours often yields even better flavor. The longer the chill, the deeper the complexity.
* **Patience with the Final Proof:** After removing the dough from the fridge and shaping, it needs time to warm up and proof (rise) again before baking. This final rise is crucial for a light, airy crumb. Don't bake until the dough looks visibly puffy and has expanded significantly.
* **Cool Completely Before Slicing:** This cannot be stressed enough. Slicing warm bread traps steam, leading to a gummy, unpleasant texture. Let your beautiful loaf cool completely on a wire rack for at least 1-2 hours before cutting into it.
* **Storage Savvy:** Once cooled, store your homemade cool rise sandwich bread in an airtight container at room temperature for 3-5 days. For longer storage, slice the loaf and freeze the slices in a freezer-safe bag. They can be popped directly into a toaster for quick use.
* **Serving Suggestions:** Beyond classic sandwiches, enjoy your cool rise bread warm from the oven with butter, topped with a dollop of honey butter for a sweet treat (as mentioned in the reference context!), or simply toasted with your favorite spreads.
Following these practical tips will help you navigate any potential issues and consistently produce delicious, bakery-quality **cool rise sandwich bread** right in your own kitchen.
In conclusion, **cool rise sandwich bread** is more than just a recipe; it's a method that empowers home bakers of all skill levels to create truly exceptional bread with minimal fuss. Its genius lies in harnessing the slow, cold fermentation process to unlock deeper flavors and achieve superior textures, all while offering unparalleled convenience. Whether you're a seasoned baker looking for an easier routine or a novice taking your first steps into the world of yeast, mastering the cool rise technique will transform your kitchen and fill your home with the irresistible aroma of freshly baked goods. So, embrace the chill, trust the process, and prepare to delight in the soft, sturdy slices of your very own homemade bread.